As an Amazon Associate, we earn from qualifying purchases. Some links on this site are affiliate links at no extra cost to you. Our recommendations are based on thorough research and editorial judgment.
How to Frame Natural Landscapes With Drone Cameras
When we frame natural landscapes with drone cameras, it’s crucial to assess composition techniques like the Rule of Thirds, adjusting altitudes for unique perspectives, and utilizing leading lines to draw viewers in. We should set ISO to 100 and monitor natural light for the best results. Including elements such as trees or rivers adds depth, while the right camera settings guarantee sharp clarity. By incorporating these strategies, we can capture stunning aerial images that truly represent the beauty below, and there’s more to explore in advanced techniques.
Key Takeaways
- Use the Rule of Thirds to position your main subject off-center, creating a more dynamic and balanced composition.
- Adjust your altitude to reveal varied perspectives, highlighting vast landscapes or interesting foreground elements.
- Incorporate leading lines, such as winding paths or rivers, to guide the viewer’s eye through the photograph.
- Experiment with framing elements like trees or hills to create depth and context within the landscape shot.
- Utilize negative space effectively to emphasize the main subject and enhance the overall visual impact of the image.
Fundamentals of Drone Landscape Photography
Hey there! If you’re looking to capture stunning landscapes with your drone, getting a good handle on the basics of drone landscape photography is key. First off, let’s talk about sensors. Opting for a drone with a larger sensor can really boost your image quality—go for something with 20 megapixels or more. This will make your photos pop with more clarity and detail.
Now, when it comes to composition, have you ever heard of the Rule of Thirds? It’s a simple technique where you imagine your frame is divided into nine equal parts. By placing your main subject along one of those grid lines or at their intersections, you naturally draw people’s eyes to what matters most in the shot. For example, if you’re photographing a mountain range, you might position the peak off to the side instead of dead center.
Planning your flight is just as important. I usually scout out locations beforehand, checking out any unique features or the best angles for my shots. You’d be surprised how much a slightly shifted position can enhance the perspective of your photo! Lastly, keeping your ISO set to 100 and shooting in RAW format is a great practice. This combination helps you capture the most detail, especially if the lighting isn’t perfect.
Also, choosing a drone equipped with a 1-inch CMOS sensor can dramatically improve your image quality and low-light performance.
With these fundamentals in your toolkit, you’re well on your way to creating a breathtaking landscape gallery. Next up, let’s look at some tips on effective flight techniques to elevate your drone photography even further!
How to Choose the Best Drone for Landscape Photography Success
Once you’ve got the basics of drone landscape photography down, picking the right drone becomes your next big step toward capturing those stunning shots. Think about it: you want a drone that not only flies well but also delivers awesome images!
First off, aim for a camera with at least 20 megapixels. This resolution helps you capture all those tiny details in your landscapes—like the textures of rocky cliffs or the delicate patterns of a flowing river. Next, check the battery life. You’ll appreciate a drone that can stay in the air for long stretches, like the DJI Mini 3 Pro, which lets you explore vast areas and grab multiple angles without constantly worrying about coming back to recharge.
Then, consider the dynamic range. Choosing a drone with adjustable ISO settings can make a real difference—especially in tricky lighting conditions, like during sunrise or sunset when shadows can be harsh. And let’s not forget about stabilization; a three-axis gimbal is a must-have to help reduce vibrations, ensuring your images stay sharp even when you’re flying at higher altitudes.
Speaking of the DJI Mini 3 Pro, its lightweight design and impressive image quality make it fantastic for all kinds of aerial adventures. With the right drone in hand, you’ll be ready to take your landscape photography to new heights! Now, let’s chat about some tips for capturing those breathtaking shots once you’re in the air.
Additionally, having a drone equipped with GPS-stabilized flight can provide precise positioning, making it easier to maintain consistent framing and composition while shooting.
Key Camera Settings for Stunning Aerial Photographs
Hey there! If you’re looking to capture some stunning aerial photographs, let’s chat about some key camera settings that can really make a difference in the quality of your shots. Start with setting your ISO to 100 on your Mini 3 Pro; this helps produce the best image quality while keeping noise to a minimum, especially when you’re flying high and the sun is shining bright.
Next up, let’s talk about white balance. Fixing it at 5500K gives your images a consistent color, which is super handy when you edit your photos later. Instead of worrying about creative modes, I recommend sticking with the native sensor format at 12MP. This way, you’ll capture every detail without unnecessary frills.
Don’t forget to turn on the histogram feature! It’s a great tool to help you check your exposure. By keeping an eye on this, you can avoid clipped highlights and shadowy areas in your shots. And if you find yourself in a situation where the lighting is really contrasting, consider bracketing your images. This means taking multiple shots at different exposures and blending them later, which can really enhance the dynamic range of your photos.
When shooting outdoors, it’s also wise to protect your gear with a waterproof rain cover to keep your equipment safe and dry in unpredictable weather.
Master Composition Techniques for Captivating Aerial Images
When it comes to aerial photography, really nailing your camera settings is just the start. Composing your shots in a way that grabs attention is just as crucial. Think of it like putting together a puzzle: the right pieces in the right spots create a stunning image.
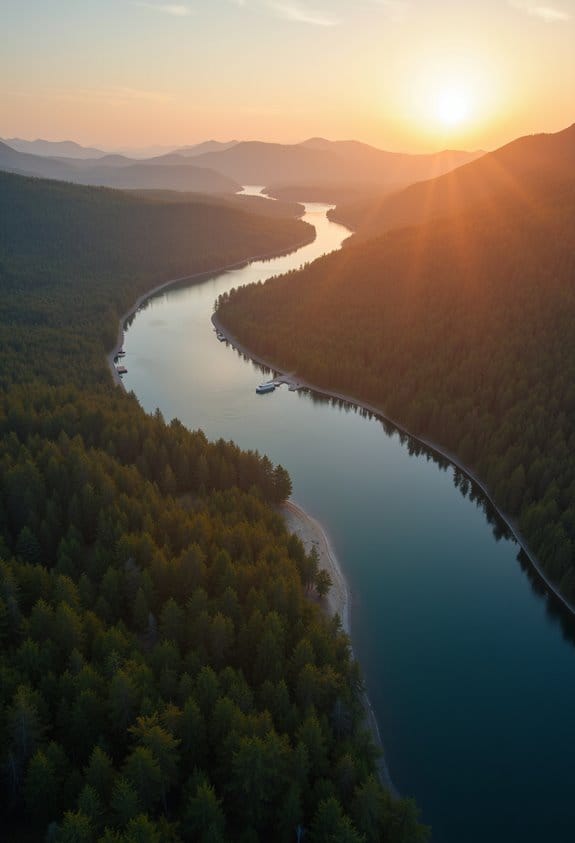
One simple technique to remember is the Rule of Thirds. Imagine breaking your frame into nine equal sections with two vertical and two horizontal lines. Place important elements, like a mountain peak or a winding river, along these lines or where they cross. It instantly adds balance to your photo! For example, if you’re flying over a beautiful landscape, position the horizon along the top third of your frame.
Another fun way to spice up your shots is by changing your altitude. Higher shots can reveal vast landscapes, giving your audience a sense of scale, while lower shots bring out interesting foreground details, like textures in the ground or patterns in a field. If you have the chance, try capturing a sunset from above, with clouds layered beneath you—it’s mesmerizing!
Don’t forget to frame your shot with surrounding elements. Including dramatic clouds or distant mountains can create depth and context in your images. Also, using negative space effectively means letting some areas of your photo be empty, focusing attention on your main subject.
For storing and handling your high-resolution aerial images, using a reliable high-performance memory card can significantly enhance your workflow by ensuring quick transfers and data safety.
Use Leading Lines to Make Your Photos Pop
Hey there! You know, when you’re out capturing aerial photography with your drone, using leading lines can really elevate your shots. These lines naturally draw the viewer’s eye to your main subject, adding depth and making your images more engaging. Think about using things like winding rivers or straight roads—they’re perfect for creating those guiding lines.
To really nail it with your DJI Mavic 2 Pro, try a few simple techniques. First, play around with the direction of your lines; diagonal lines tend to add a sense of motion and drama compared to horizontal or vertical ones. Also, don’t hesitate to fly at different altitudes. Sometimes, a slight change in height can reveal unique lines that you just can’t see from the ground.
You’ll also want to shoot during the golden hours—early morning or late afternoon—when the light is softer and more flattering. This kind of lighting can really emphasize those leading lines, bringing your landscape to life. So, get out there and start experimenting; soon enough, your photos will stand out! And once you’ve got the hang of it, we can talk about framing your subjects for even more impact. Using drones with 3-axis brushless gimbal stabilization can help you capture sharper and more stable aerial images that enhance these natural leading lines.
Scouting Locations for Unique Perspectives
Hey there! If you’re looking to find the best spots for capturing unique drone perspectives, the key is in scouting locations beforehand. This way, you can make the most of your shooting conditions. I love using apps like AirMap and Google Earth—they’re super handy for checking flying zones and spotting interesting features to photograph. For example, you might find a secluded beach or a hidden valley that everyone else overlooks, just by taking a little extra time to explore.
Don’t forget to check out local regulations regarding drone use, as they really can vary from one place to another. Plus, when you’re out scouting, keep an eye on the weather and how the natural light changes throughout the day. Bright morning light feels totally different than the golden hour just before sunset, so plan your flights accordantly.
Lastly, when it comes to editing, spending time in Lightroom or Photoshop can really make those landscapes pop. Trust me, the images you can capture from above can be absolutely breathtaking with just a few tweaks. So, with this prep work, you’re setting yourself up for some amazing drone shots! Speaking of which, let’s chat about how to maximize those editing techniques to really enhance your images. Ensuring a stable shot using a 3-Axis Gimbal can also greatly improve image clarity before editing.
When to Fly for the Best Light?
Hey! Have you ever wondered when is the best time to fly your drone for some jaw-dropping photos? Well, I’ve got to say, the golden hours—right after the sun rises and just before it sets—are absolute magic for drone photography. The light is soft and warm during these times, really bringing out the textures and colors of the landscape.
Also, keep an eye on the weather! Overcast days can actually be your friend because the cloud cover diffuses the sunlight, which means you get even lighting with fewer harsh shadows. That’s ideal for capturing those beautiful, sweeping shots of nature. Plus, flying early in the morning often gives you clearer air and less wind, which helps keep your drone steady and your images sharp.
And hey, if you’re lucky enough to encounter some fog at dawn, definitely take advantage of it! Fog can add an incredible layer of depth and mystery to your photos, making the scenery feel almost dreamlike. So, whether you’re shooting mountains or cityscapes, timing your flights right can really elevate your photography game! Now, let’s talk about the gear and settings that can make those photos pop even more.
For the best results, consider using a drone with GPS features to enhance flight stability during those critical lighting moments.
How to Capture Unique Perspectives in Your Shots?
Hey there! Capturing unique perspectives in your drone shots is such an exciting way to elevate your landscape photography and really tell a story. Think about it: when you experiment with a top-down view—where the camera points directly down at a 90-degree angle—you can showcase beautiful patterns in the landscape that you might’ve missed from the ground.
Now, changing your altitude is another game-changer. When you fly higher, you can get these sweeping views that really capture the vastness of a scene. But if you swoop down lower, that’s where you can really highlight the intricacies and details of the environment, like the texture of the ground or the shape of individual trees.
Consider how you can use natural landmarks or leading lines in your compositions to guide the viewer’s gaze. For example, a winding river or a path can draw the eyes into the heart of the scene, adding another layer of intrigue. And don’t forget about keeping your frame clean—scout your location ahead of time to make sure there are no distracting elements in the shot.
If you adjust your flight path along with your camera angles, you’ll find those unique perspectives that make your photography stand out. So, as you explore these techniques, you’ll not only enhance your skills but also discover new ways to showcase the beauty of our world. Ready to take your shots to the next level? Let’s chat about some creative angles next! Using drones equipped with advanced gimbal technology can help ensure your footage remains smooth and stable as you experiment with different perspectives.
Incorporating Natural Elements Into Your Aerial Photos
When you’re out there capturing aerial photos, you really want to think about how natural elements can elevate your shots. Imagine using tall trees or winding rivers that lead the viewer’s eye straight to your main subject—it really adds an extra layer of interest! A great tip is to play with contrasting colors, like the bright hues of wildflowers popping against green grass or the serene blue of a lake.
Layering is super important too; for example, if you position some rocky outcrops in the foreground, it creates a sense of depth that pulls people into the scene. Don’t forget how weather can change the mood of your photo, like capturing a misty landscape that brings a certain mystique to it. And by varying your altitude while flying, you can catch those beautiful light and shadow interactions that enhance the textures in your image.
Next time you’re planning a flight, think about all these elements and how you can work with them to capture stunning vistas! Also, choosing a drone with advanced stabilization technology will ensure your footage remains smooth and professional, even when capturing dynamic natural scenes.
Advanced Post-Processing Tips for Your Aerial Photography
Hey there! If you think the magic of aerial photography happens solely in the air with your drone, think again! The real transformation often unfolds in post-processing. Let me share some advanced tips that can take your stunning aerial shots to the next level.
First up is luminosity masking. This technique is fantastic because it allows you to tweak highlights and shadows without losing any detail, giving your images a real sense of depth. For example, if you’ve captured a breathtaking sunset, you can brighten the clouds while keeping the foreground perfectly balanced.
Next, consider blending multiple exposures. This method lets you capture a scene at different exposures, so you don’t have to choose between bright skies and detailed land below. Imagine shooting a landscape during golden hour: by merging these exposures, you create a balanced image that highlights both the warm glow of the sunset and the textures of the ground.
Another essential step is lens distortion correction. Drone lenses can sometimes create a ‘fish-eye’ effect, especially around the edges of your photos. Fixing this is crucial for landscapes where you want straight lines—think of those stunning geometric fields or sharp horizon lines.
Don’t forget to keep an eye on your histogram too. Checking this regularly ensures your exposure is on point, helping you avoid blown-out highlights or overly dark shadows. If you find the histogram skewed, you might need to adjust your settings or recover some details in post.
Finally, tweaking your color and contrast levels can really make your images pop. A well-balanced landscape can mesmerize the viewer. For instance, increasing the contrast slightly can help the rich greens of a forest stand out against a deep blue sky.
Additionally, mastering your drone’s stability and hovering capabilities ensures your raw shots are crisp and steady, giving you a stronger foundation for post-processing enhancements.
Recommended Products
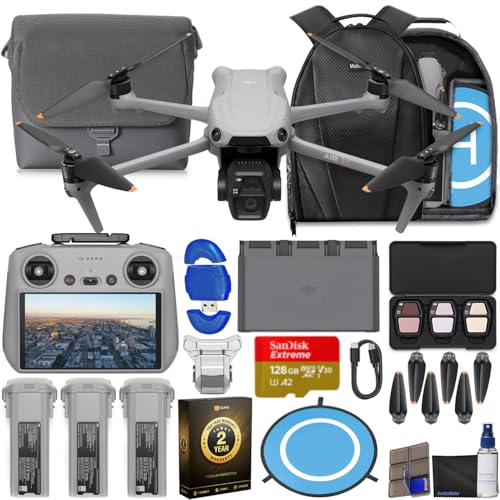
This Bundle Includes: DJI Air 3S Drone, RC 2 Remote Controller, 3 x Intelligent Flight Battery, 128GB Extreme microSD Memory Card, High USB Speed Memory Card Reader, Shoulder Bag , Drone Photography Backpack, 3 x Extra Pair of Low-Noise Propeller, Gimbal Protector, USB-C PD Cable, ND Filter Set (ND8, ND32 & ND128), Battery Charging Hub, Drone Landing Pad, Camera Lens Cleaning Kit, 6-Slot Memory Card Wallet, CPS 2 Year Warranty, Bundle It Better Lens Cloth

Enhanced Camera for Travel Shots - Air 3S's 1" CMOS primary camera delivers breathtaking shots with enriched detail in low-light scenarios like sunsets and nightscapes.

See Description what kit includes Ultra-Light, Palm-Sized Foldable Design - Compact and foldable, this palm-sized drone slips easily into a pocket and offers 42GB of internal storage for uninterrupted flying [7].
Frequently Asked Questions
What Is the Rule of 3 in Landscape Photography?
In landscape photography, the rule of thirds is essential for creating visual balance. By using effective framing techniques, we enhance composition and perspective choices, capturing depth and engaging viewers in a dynamic way that draws them in.
What Is the 1 to 1 Rule Drone?
When we embrace the 1 to 1 rule, we balance drone altitude and perspective angles, crafting enthralling compositions. This technique enhances visual storytelling, guiding viewers through our landscapes with purposeful framing and thoughtful editing.
How to Take Real Estate Photos With a Drone?
To take stunning real estate photos with a drone, we should focus on diverse angles, utilize lighting techniques, highlight property features, apply composition tips, and enhance images through effective photo editing for intriguing aerial perspectives.
How to Design a Drone Frame?
We can create a stunning drone frame by prioritizing frame composition and exploring aerial perspectives. By utilizing various drone angles, considering landscape features, and experimenting with lens choices and lighting techniques, our captures will truly shine.