As an Amazon Associate, we earn from qualifying purchases. Some links on this site are affiliate links at no extra cost to you. Our recommendations are based on thorough research and editorial judgment.

How to Achieve Proper White Balance in Aerial Photography
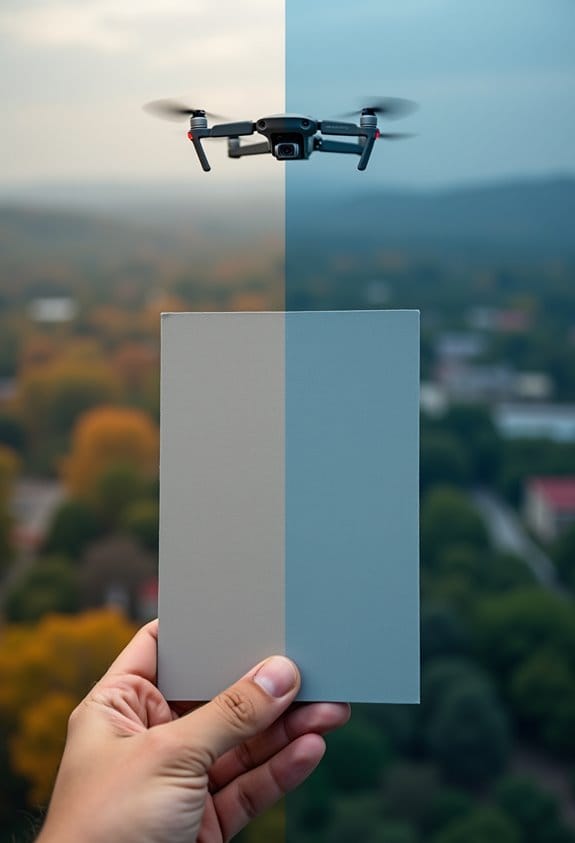
To achieve proper white balance in aerial photography, we must manually adjust our camera settings based on lighting conditions. We recommend using a grey card for calibration, then entering the corresponding Kelvin value. On bright sunny days, set it to 5200K to 5500K, and for cloudy days, adjust to 6000K to 6500K. Avoid relying on Auto White Balance to prevent color shifts, and keep an eye on changes during flights. By mastering these techniques, we can capture stunning, true-to-life aerial images, and there’s plenty more to explore.
Key Takeaways
- Use a grey card for accurate white balance calibration under the specific lighting conditions before each aerial shoot.
- Set manual white balance instead of relying on Auto White Balance (AWB) to avoid inconsistent color shifts.
- Adjust Kelvin values based on lighting: 5200K to 5500K for sunny days, 6000K to 6500K for cloudy days.
- Continuously monitor and adjust white balance during flights due to changing lighting conditions and shadow variations.
- Correct white balance in post-production by referencing grey card photos and using editing software to adjust temperature and tint.
How to Achieve Proper White Balance in Aerial Photography
When it comes to aerial photography, getting the white balance right is super important to capture those true colors in your shots. Basically, white balance helps your camera recognize what “white” looks like in different lighting. For instance, if it’s early morning with golden sunlight, you might want to set your camera to around 3000K to keep those warm tones accurate. But on a clear day around noon, you could crank it up to 6000K to capture those cooler shades.
One neat trick is to use a grey card for setting your manual white balance. Just snap a photo of the card in your current lighting before you start shooting. This helps your camera understand the lighting environment, making it easier to adjust your settings correctly. Oh, and always shoot in RAW format! This gives you more flexibility in editing later.
As you’re flying around for those perfect shots, keep an eye on how the light shifts. Sometimes, clouds move in or the sun changes its angle, and you’ll want to recalibrate your white balance to maintain consistent colors in your photos. It’s all about keeping the natural beauty of your aerial shots intact. Ready to explore other tips for enhancing your aerial photography? Let’s dive into composition next!
For the best results, consider choosing a drone with advanced stabilization features to ensure your footage remains clear and color-accurate despite movement.
How to Set White Balance Using a Grey Card
Setting white balance using a grey card can really boost the color accuracy in your aerial photography. It’s a handy little tool that ensures your images look true to life. So, here’s how you do it: first, grab your grey card and place it in front of the camera, right under the same lighting you’ll use for your subject. Make sure the card fills the frame completely; this gives you a solid reference that helps eliminate any color bias from the surroundings.
Once you’ve taken that reference photo, open up the DJI app and select “Custom” under the white balance settings. This is where you’ll enter the Kelvin value that matches your reference. For instance, if you’re shooting during golden hour, you might want to adjust your Kelvin to around 5700K for a warm, vibrant look. Don’t forget to check your white balance regularly as lighting can shift quickly, especially when you’re out in the field.
Keeping those grey card reference photos handy in post-processing is a smart move. When you’re editing, you can easily adjust the white balance in your software and ensure your colors are consistent across all your shots. It’s all about achieving that beautiful, accurate color every time you click the shutter. Now, let’s talk about how to combine this technique with other editing adjustments for even better results. Additionally, using materials with low VOC emissions nearby can help maintain accurate color representation by minimizing air quality interference.
What Are the Common Challenges With Automatic White Balance?
Hey there! Have you ever taken aerial photos and ended up with colors that just don’t seem to match, even though the lighting was pretty similar? That could be due to your camera’s automatic white balance (AWB). This feature can really trip us up, especially when you’re dealing with mixed lighting. For instance, if you’re flying over a shaded forest and then out into the bright sun, AWB might struggle to adjust, causing those annoying color casts that can mess with the quality of your shots.
Also, think about those moments when you’re filming something dynamic, like a bustling cityscape. If the light is constantly changing, AWB can create flickers or shifts in color that are pretty distracting in your footage. Imagine spending hours in post-production just trying to correct those colors, when you could have been focusing on other aspects of your project.
There are also scenes that can throw AWB completely off, like stunning sunsets or snowy landscapes. Those powerful colors and hues can come out all wrong if your camera can’t read them properly. It’s a real challenge if you’re trying to capture the true beauty of those moments in aerial photography. So, knowing how AWB works—and its limitations—can help you make better choices when you’re out capturing those breathtaking views. Many professional drones now feature advanced 3-axis gimbal stabilization which helps maintain consistent image quality despite environmental changes.
Recommended Kelvin Values for Different Lighting Conditions
Hey there! So, if you’re into aerial photography, mastering white balance is super important. Trust me, relying on automatic settings can sometimes lead to colors that just don’t look quite right, especially when the lighting is all over the place. To nail those true colors, it’s helpful to know a few Kelvin values for different scenarios.
For instance, on bright sunny days, setting your white balance to around 5200K to 5500K can really help capture those vibrant blues and greens. If you’re out shooting on a cloudy day, bumping it up to about 6000K to 6500K will warm things up nicely, giving your images a cozy feel.
During that magical golden hour right before sunset, aim for a setting around 3500K to 4000K. This captures those warm hues perfectly, making your shots look stunning. And if you’re snapping photos in shady spots, setting it to 7000K can help balance out those cool shadows, preventing your images from looking too bluish.
Finally, if you’re dealing with artificial lighting, like street lamps or indoor lights, sticking to 3000K to 4000K can keep those unwanted color casts at bay. Keeping these adjustments in mind can really transform your aerial images into vibrant and natural-looking masterpieces, no matter the situation.
Also, when carrying your gear outdoors, using a weather-resistant bag helps protect your equipment from unexpected conditions, ensuring your shots go uninterrupted.
Ready to take to the skies? Let’s gear up and explore some tips for composing your shots!
In-Flight Techniques for Adjusting White Balance
Hey there! When we’re up in the air snapping aerial photos, it’s super important to keep an eye on the white balance. You know how lighting can change so quickly depending on the clouds, time of day, or even the terrain below? It’s essential to stay on top of that to get our colors just right. If we suddenly enter a new lighting situation, like going from sunny skies to deep shadows as we pass over a mountain, we definitely need to adjust our manual white balance settings.
One handy tip is to always have a grey card on hand. You can whip that out and snap a quick reference shot to help with accurate white balance adjustments. If things are pretty consistent—let’s say it’s a bright sunny day—setting your camera’s white balance to a fixed option like “Daylight” can help you maintain that color balance throughout your photos. It’s all about making the smoothest transitions between shots, especially when we’re outdoors and the lighting changes. Also, using drones with adjustable 90° lenses can help capture consistent angles and lighting, making white balance adjustments more manageable.
Effective Techniques for Maintaining White Balance Consistency in Video
Hey there! If you’re getting into aerial video shooting, one thing you’ll definitely want to keep an eye on is white balance consistency. It’s super important for ensuring that your footage looks uniform, especially when you’re flying and the lighting can change so quickly. To avoid those awkward shifts in color, start each shoot by manually setting your white balance. You might choose Daylight, or even fine-tune it with a specific Kelvin value if you know the exact lighting conditions you’ll be dealing with.
Let’s break down a couple of cool techniques that can really help. For one, using a grey card or a piece of white paper for calibration before you take off can work wonders. Just point your camera at the card and get your settings right—this will give you a solid reference point. Also, keep your eyes peeled for any changes in lighting while you’re up there; if you fly into a shaded area or suddenly hit a patch of bright sun, you may need to tweak those settings on the fly.
Trust me, steer clear of Auto White Balance! It tends to throw a wrench in your editing since it can create those funky color temperature shifts. By taking control of your white balance, you set yourself up for a much smoother post-production process. Additionally, protecting your camera gear during aerial shoots by using a durable waterproof drone backpack can help maintain equipment performance in varying weather conditions. So, now that you have a handle on that, let’s move on to mastering shot composition for your aerial footage!
How to Correct White Balance in Post-Production
Hey there! You know, correcting white balance in post-production can really change the game for your photos. It can take a good shot to a whole new level, especially when we’re talking about aerial photography. The key to accurate color correction is to use a reference photo of a grey card that you snapped during the shoot. This helps us make sure everything looks just right.
When you’re in editing software like Lightroom, try using the eyedropper tool to click on something that should be neutral gray or white in your photo. It’s a simple way to adjust the white balance. After that, you can play around with the ‘Temp’ and ‘Tint’ sliders until the colors look more natural and free from any weird color casts. For example, if your image has a bluish tint, moving the Temp slider toward the warmer side can help balance it out.
Also, remember to shoot in RAW format! It gives you way more flexibility when it comes to adjusting white balance without messing up the image quality. Finally, if you’ve got a bunch of aerial shots from the same shoot, syncing your settings across those images helps make sure they all look consistent. With a little practice, you’ll be able to elevate your aerial photography even more! Using advanced editing tools from video and photo editing software can further refine your images during post-production.
Techniques to Ensure Accurate Color and White Balance in Aerial Shots
If you want to nail accurate color and white balance in your aerial photography, there are some simple techniques that can make a big difference. First up, let’s talk about manual white balance settings on your camera. By adjusting the Kelvin temperature—like setting it to 5500K for a bright sunny day or 7500K for those cloudy skies—you can really fine-tune the colors in your shots based on the lighting around you.
Another handy tip is to capture reference photos with a grey card. It’s a simple way to help you calibrate your white balance before you start snapping away. Just take a quick shot of the grey card in the same lighting as your scene, and you can easily make those precise adjustments later on. Plus, don’t forget to keep an eye on changing lighting during your flight. If the sun peeks out or clouds roll in, adjust your settings!
Finally, shooting in RAW format is key. It gives you much more flexibility when editing since you can tweak the colors without losing image quality. Additionally, using drones with advanced stabilization technology can help minimize color distortions caused by motion, enhancing the accuracy of your aerial shots. So, by using these techniques, you’ll keep your aerial shots looking vibrant and true to life. Next, let’s explore some composition tips to enhance your aerial imagery even further!
Troubleshooting White Balance Issues in Editing
Dealing with white balance issues in editing can seem daunting, but I promise, it’s easier than it sounds! The first step is to find a neutral gray or white area in your aerial shots. You can use the eyedropper tool to click on that spot, and it will help you adjust the color temperature just right. For example, if your image has a bluish tint, you can tweak the temperature sliders—Temp and Tint—to get it back to a natural look.
If you notice that some highlights are way too bright or your shadows are pitch black, a histogram adjustment can really come in handy. It helps you see if your white balance is off. As a practical tip, software like ColorWasher can be a lifesaver for advanced color corrections and can even out color distributions across your edits. Ensuring your editing workflow incorporates built-in safety features from equipment and software can prevent errors and improve overall consistency.
Maximizing Authentic Colors in Aerial Photography
Have you ever wondered how to keep the colors in your aerial photographs looking true to life? Maximizing authentic colors is all about getting the white balance just right. One great way to do this is to use the manual white balance feature on your camera. You can tweak the Kelvin temperature based on the specific lighting conditions you’re dealing with. For instance, if you’re shooting near a sunset, warming up the color a bit can really enhance the warmth of that golden hour light.
Carrying along a grey card or even a piece of white paper can help you set a custom white balance too. Just take a picture of the card or paper in the same light before you start shooting, and then adjust your settings. Super simple, right? Also, if you shoot in RAW format, you can adjust the white balance later when you edit your photos. This gives you a lot of flexibility to get the colors just how you want them.
Don’t forget to regularly check and recalibrate your white balance during the flight, especially if you’re flying through different lighting conditions—like going from bright sunlight to shadowed areas beneath clouds. Keeping this in mind, you’ll want to have some reference photos handy, ideally taken with that white balance card you brought along. This way, you can ensure consistency in your aerial photography, no matter how varied the light may be. It just takes a little practice, but soon, you’ll feel like a pro!
Also, taking advantage of stability and hovering technology in drones can help maintain consistent lighting conditions for better white balance throughout your flight.
Frequently Asked Questions
How to Properly White Balance a Photo?
When we’re capturing moments, proper white balance techniques are essential. Using gray cards helps with manual white balance and Kelvin scale usage. Shooting in RAW allows easy editing for balance, ensuring vibrant color temperature adjustments.
What Is the Rule of 3 in Landscape Photography?
The Rule of Thirds enhances landscape symmetry, ensuring subject placement creates depth and foreground interest. By applying these composition techniques, we can achieve color harmony and visual impact, considerably elevating our photography’s overall effectiveness.
How to Find Correct White Balance?
Finding the correct white balance’s like tuning a musical instrument; we must use a gray card under varying lighting conditions during blue and golden hours, making manual adjustments for accurate color temperature, even in post-processing.
What Are the Best Settings for White Balance?
For the best white balance settings, we can start with Auto White Balance for convenience, but Manual White Balance gives us control. Daylight and Cloudy settings work well, while Custom Settings handle specific lighting like Incandescent and Fluorescent light.