As an Amazon Associate, we earn from qualifying purchases. Some links on this site are affiliate links at no extra cost to you. Our recommendations are based on thorough research and editorial judgment.

How to Pack Your Drone for Hiking and Outdoor Adventures
When packing our drones for hiking and outdoor adventures, we should prioritize protection and efficiency. Start by choosing a lightweight model like the DJI Mini 4 Pro or DJI Air 3S, then pack spare batteries, extra microSD cards, and weather-resistant accessories. Use a dedicated carrying case to shield against elements and opt for a comfortable, weather-protected backpack. Ensuring our drone’s gear is organized makes for a smoother outing. Let’s explore more tips to enhance our outdoor drone experience.
Key Takeaways
- Choose a lightweight, compact drone like the DJI Mini 4 Pro or DJI Air 3S for easy transport and setup during hikes.
- Use a dedicated drone carrying bag with padded compartments to protect the drone and accessories from damage while maintaining organization.
- Pack spare batteries in insulated cases to keep them warm and ensure you have enough power for extended flights.
- Include extra microSD cards to provide ample storage for capturing high-resolution photos and videos throughout your outdoor adventure.
- Always check the weather forecast and local drone regulations to ensure safe and compliant flying during your hike.
Choose the Right Drone for Your Hiking Adventures

When you’re gearing up for your hiking adventures, choosing the right drone can really impact how much you enjoy the experience. For instance, if you’re looking for something that’s easy to pack, the DJI Mini 4 Pro is a fantastic option. It’s lightweight and folds up nicely, making it a breeze to carry along with all your gear. Plus, its camera packs a punch, capturing beautiful landscapes without weighing you down.
On the flip side, if you’re planning to tackle some tougher trails or expect blustery weather, consider the DJI Air 3S. This drone features dual cameras and offers better stability, which is especially helpful on windy days. Imagine flying your drone along a cliff edge and getting crisp shots while the wind whips around you—this drone makes it possible!
Don’t forget about battery life! Both models give you pretty decent flight times, but it’s a smart idea to bring along a couple of spare batteries. Trust me, there’s nothing worse than getting the perfect shot and running out of battery just before capturing it. Also, keep an eye on the skies—if the weather looks unpredictable, the DJI Air 3S will give you more confidence against those nature’s curveballs.
To ensure your footage is saved safely and with high quality, it’s wise to use a U3 memory card that supports 4K video recording and high-speed data transfer.
With so many options to consider, this sets you up nicely for the next step: planning your perfect hiking route that offers stunning scenery for amazing drone footage!
Essential Hiking Accessories for Your Drone
When you’re heading out on a hiking adventure, having the right drone can really enhance your experience, especially when it comes to capturing those breathtaking views. But what about the essential accessories that make flying your drone a breeze? Let’s chat about a few must-haves to keep your drone safe and sound on the trails.
First off, a weather-resistant carrying case is your best friend. It not only protects your drone from rain and dust but also prevents those pesky scratches from rocks or branches as you trek along. Imagine pulling your drone out at a waterfall, knowing it’s secure and ready for action!
Next up, consider getting lens covers and propeller guards**. These little guys are lifesavers. They keep your camera lens from getting scratched during transport and prevent any mishaps with the propellers while flying. It’s a good idea to check out a landing pad**, too. It gives your drone a clean spot to touch down and helps you spot it easily if you’re flying at dusk.
Don’t forget about extra power! Packing spare batteries can really extend your outdoor filming opportunities. If you’re in a stunning location and don’t want to stop to recharge, just swap out the battery and keep shooting.
Finally, an antenna signal range booster can make a huge difference, boosting your drone’s control and flying range while you’re out there exploring. It’s perfect for those remote spots where the signal can be spotty.
Additionally, using filters like reverse graduated ND filters can significantly improve the quality of your aerial shots by balancing light and reducing glare.
With these handy accessories, you’re all set for your next hiking trip. You’ll be able to focus on capturing amazing footage without worrying about your gear. Now, let’s take a look at some tips on finding those perfect hiking spots for your drone photography!
Protect Your Drone From the Weather

Hey, if you want to protect your drone from the weather, the first thing you should do is keep it and all your accessories tucked away securely in your backpack. This will help shield them from any rain or dust while you’re on the go, which is super important! For instance, if you’re hiking in the mountains, stashing your gear away can save it from getting soaked or dusty when you whip it out for a spectacular shot.
Before you hit the outdoors, it’s a good idea to check the weather forecast. Unexpected changes can really mess with your flying experience and safety. For instance, if you have a DJI Air 3S, it will handle windy conditions better than the DJI Mini 4 Pro would. So, plan accordingly based on where you’re headed and which drone you’re flying!
Ultimately, being aware of the weather and choosing the right gear can make a huge difference. That way, you can focus on capturing awesome shots instead of worrying about the elements! Using a waterproof drone case can provide peace of mind by keeping your gear safe and dry in sudden rain or rough conditions.
Proven Strategies for Managing Drone Battery Life During Hikes
Hey there! You know, after we’ve done our best to shield our drone from the elements, managing battery life becomes super important for a successful hiking adventure. One great tip is to always pack spare batteries. I can’t stress this enough, especially since colder weather can really drain battery life quicker than you might expect. To avoid running low on juice, make sure you fully charge your batteries before the hike and store them in insulated cases. This keeps them warm and happy!
While we’re out there having fun, you’ll definitely want to keep an eye on those battery levels as you fly. A good rule of thumb is to plan your routes so you can easily get back to where you took off before the battery gets too low. Oh, and consider bringing along a lightweight power bank or a solar charger. For instance, I recently used a small solar charger on a hike, and it worked wonders at keeping my batteries topped up while I enjoyed the scenery.
Another tip? Keep a few extra microSD cards on hand. You never know when you’ll want to capture that perfect shot, and it’s much easier to manage your storage when you’re not worrying about running out of space. Using high-speed UHS-II memory cards can ensure fast file transfers and reliable storage for 4K or even 8K video footage. So, with these battery management strategies under our belt, we can focus on having an amazing experience in the great outdoors! Speaking of which, let’s chat about the best spots to take our drones for some epic shots.
Know Local Drone Regulations Before You Hit the Trail
Hey there! Before we hit the hiking trails with our drones, it’s super important to get a grasp on the local drone regulations. Trust me, understanding these rules can really enhance our adventure. In the UK, the Civil Aviation Authority (CAA) is in charge of drone flights, so let’s break down what we need to keep in mind.
First off, we need to always keep our drone within our sight. This means no flying it out of sight while we’re wandering through beautiful landscapes. Also, watch out for restricted airspace—places like national parks or areas near popular trails often have limits. And to be safe, we should keep our drones at a good distance from people, vehicles, and buildings.
For example, if we’re near a busy trail, we want to ensure there are no hikers too close to our drone’s flight path. Many hiking spots are close to protected zones, so taking a moment to check these regulations can save us from troubles down the line.
A handy tool for this is the CAA’s Drone Assist app. It’s perfect for checking no-fly zones right from our smartphones, ensuring we stay compliant with the rules while having fun. Using reliable accessories like right angle cables can also help maintain your drone’s power and data connectivity on the go. Now that we’ve covered the basics, let’s get into some tips for capturing stunning drone footage on our hike!
How to Pack Your Drone and Gear Efficiently
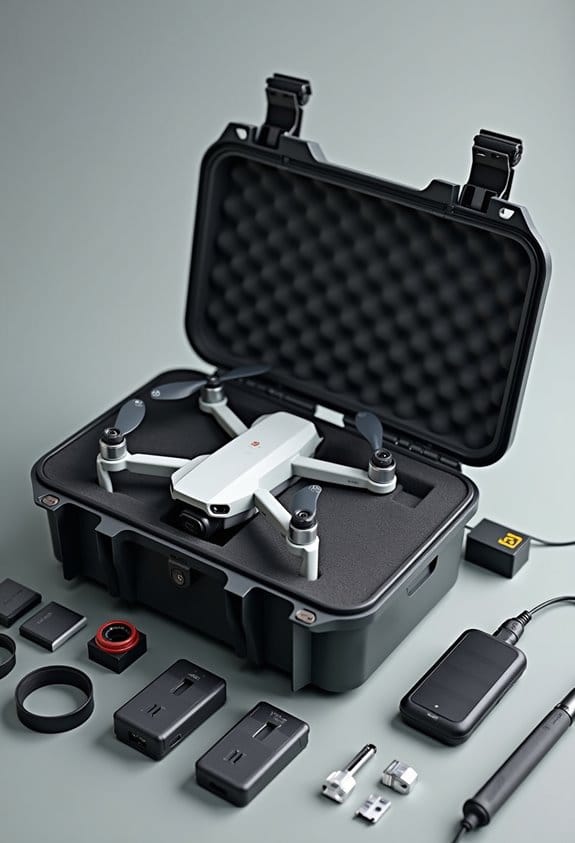
When you’re hitting the trails with your drone and gear, packing efficiently can really make or break your experience. Think of your drone as your trusty sidekick; you’ll want to make sure it’s safe and sound while you chase those amazing views. Start by grabbing a dedicated drone carrying bag—this is a lifesaver! With separate compartments for the drone, batteries, and all those little accessories, you’ll keep everything organized and protected. Trust me, it helps avoid the heartache of discovering a damaged propeller or an uncharged battery when you’re ready to take off.
Choosing lightweight, compact drones like the DJI Mini 4 Pro or DJI Air 3S can make a huge difference too. These models are not only portable but also pack a punch when it comes to performance. Plus, if you add some padding around delicate parts like the gimbal and camera, you’ll be shielding your gear from bumps and knocks along the way.
Also, don’t forget to pack extra microSD cards! You can’t have too much storage when you’re out there capturing stunning high-resolution footage. And speaking of packing, it’s smart to manage your batteries: keep your spare batteries charged and insulated in their own compartment to maximize your flying time. Using a backpack with customizable compartments ensures that each piece of your gear is securely stored and easy to access, enhancing your overall packing efficiency.
Mastering Aerial Photography While Hiking
If you want to elevate your aerial photography game while hiking, there are some simple yet effective strategies you can try. First off, think about experimenting with different camera angles. For example, try flying your drone low and then orbiting around a landmark—that’ll create some stunning footage with great depth. You can also use smart flight modes like ActiveTrack, which allows the drone to follow you automatically while you keep hiking.
Before you head out, take some time to plan your shots based on the terrain you’ll encounter. This way, you can frame those breathtaking mountain vistas or lush valleys just right. Timing is also crucial. Aim to capture your photos during the golden hour, which is that magical time shortly after sunrise or before sunset when the light is softer and shadows create beautiful contrasts.
Then there’s the importance of smooth movements. If you practice moving your drone gently, you can avoid jarring footage that detracts from the beauty of your shots. Keeping a visual line of sight with your drone is important too; it helps maintain focus and clarity in your captures. Take these tips to heart, and you’ll find yourself sharing photos that truly resonate with anyone who sees them. Now, how about we look into editing techniques that can further enhance your aerial shots? Using drones equipped with a 3-axis gimbal ensures your footage remains stable and professional-looking even during dynamic movement.
Select the Optimal Backpack for Your Drone
Choosing the right backpack for your drone is super important, especially if you’re planning to hit the trails! You want something that’s not just functional but also comfortable. Think about it: you’re out hiking, and you don’t want a heavy bag dragging you down or straining your back.
First off, look for a backpack that has a dedicated compartment just for your drone and its accessories. This way, everything stays organized and protected. Imagine needing your extra batteries or propellers quickly, and instead of rummaging through a jumbled mess, you can grab them right away!
Next, opt for a lightweight backpack that’s compact and won’t weigh you down too much. Some models even have room for a laptop, perfect for when you want to edit your footage after a day of flying your drone. For example, a backpack that weighs less than two pounds can make a huge difference on longer hikes.
Don’t forget about weather protection! A solid backpack should come with a rainproof cover—rain can sneak up on you, and the last thing you want is to risk your gear getting soaked.
Lastly, pay attention to ventilation and how the weight distributes on your back. You want a backpack that feels balanced and breathable, especially if you’re on the trail for a while. Comfort means you’ll enjoy your adventure much more!
Also, choosing a bag that features multi-pocket organization can simplify access and keep your drone gear neatly separated during your trip.
With these tips, you’ll be on your way to finding a backpack that keeps your drone gear safe while keeping you comfy on those outdoor escapades. Now that you’ve got your backpack sorted, let’s talk about what gear is essential to pack alongside your drone!
Implement Best Practices for Operating Your Drone
Hey there! When you’re out on the trails with your drone, it’s super important to follow some best practices. Not only does this keep you compliant with regulations, but it also makes your flying experience so much better. For starters, always keep your drone in sight and make sure it stays below 400 feet. This is a safety rule that also helps you avoid trouble with local laws.
Before you head out, check for no-fly zones. Using apps like CAA’s Drone Assist can make this a breeze. They help you navigate areas where flying might not be allowed, so you can always have peace of mind while you’re up in the air. It’s also crucial to keep an eye on your battery. Consider bringing along spare batteries and a handy solar charger so you can maximize your flight time and capture all those breathtaking views.
Don’t forget to protect your equipment! Weather-resistant cases can really come in handy, especially if the weather takes a turn. And if you want to make your filming easier, try using intelligent flight modes like ActiveTrack. This feature can help you focus on enjoying the adventure while the drone captures stunning shots of your journey. Additionally, choosing a drone with obstacle avoidance can help ensure safe flights even in challenging environments.
Frequently Asked Questions
How to Carry a Drone When Hiking?
When we hiked Snowdon, we used a drone case with sturdy backpack straps, keeping our drone secure and accessible. This setup allowed for easy transport and quick deployment, making our adventure even more memorable.
What Is the 1 to 1 Rule Drone?
The 1 to 1 Rule for drones mandates maintaining one foot of distance for every foot of altitude, ensuring drone safety and clear visual access, which is essential for us when capturing aerial photography without complications.
What Is the 249G Rule for Drones?
We’ve discovered that the 249g rule allows us to fly drones under 250 grams without registration, simplifying drone regulations. It’s essential, though, to monitor our flying weight to stay compliant and maximize our flying experiences.
Why Did the US Ban DJI Drones?
The US banned DJI drones due to concerns about national security and data privacy. US regulations aimed at protecting sensitive information have prompted scrutiny of DJI, especially in light of geopolitical tensions with China.


