As an Amazon Associate, we earn from qualifying purchases. Some links on this site are affiliate links at no extra cost to you. Our recommendations are based on thorough research and editorial judgment.
RAW vs JPEG: Which Format Should You Use for Drone Photos
When deciding between RAW and JPEG for drone photos, we should consider our specific needs. RAW files capture more detail and allow for extensive editing, making them perfect for high-quality projects. JPEGs, on the other hand, are smaller and easier to share, which is great for quick social media uploads. If we want to balance quality with convenience, shooting in both formats may be the best option. Let’s explore these formats further to understand their benefits.
Key Takeaways
- RAW format provides extensive editing flexibility and retains maximum detail, making it ideal for high-quality drone photography.
- JPEG files are smaller, enabling quicker sharing on social media, perfect for capturing and posting fast-action moments.
- Using both formats allows you to enhance your editing options while still enjoying the convenience of instant sharing.
- For sensitive lighting conditions or special projects, prioritize shooting in RAW; use JPEG for casual, everyday shots.
- Consider your project needs—RAW for in-depth editing and future enhancements, JPEG for immediate use and sharing efficiency.
Understanding RAW and JPEG Formats in Drone Photography

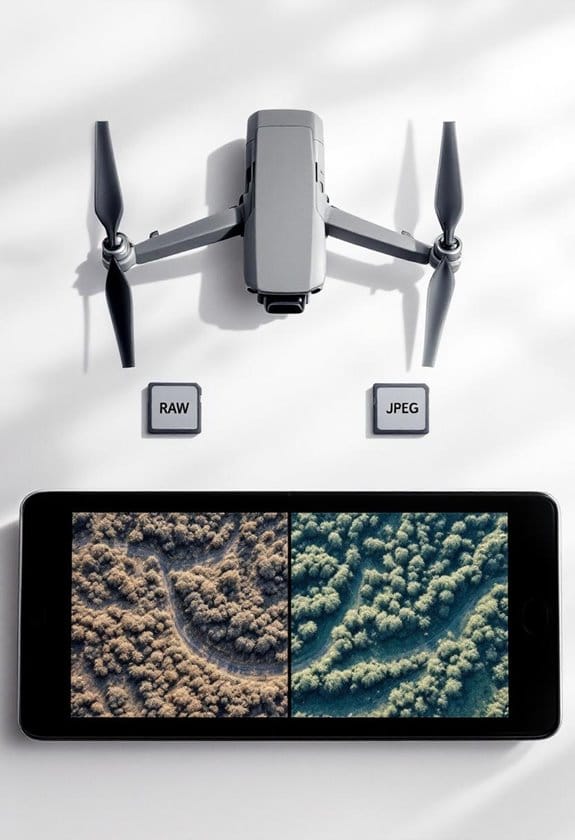
When you’re out there capturing stunning aerial shots with your drone, you might find yourself pondering the RAW versus JPEG debate. So, what’s the best format for drone photography? Basically, RAW files are like a blank canvas that give you all the detailed sensor data, making them perfect for tweaking and refining your images later. On the flip side, JPEGs are compressed, which means they’re smaller and easier to manage but they don’t offer as much flexibility when it comes to editing.
Let’s break it down: RAW files take up more space, so you’ll need to have enough storage on hand—think of it as packing an extra suitcase for a trip. JPEGs, however, shoot faster; you’ll only wait about 2 seconds between shots—great for those fast-action moments in landscape photography! While post-processing RAW files can take a bit of time, the results can be stunning, letting you adjust colors and contrast like a pro.
One smart approach is to shoot in both formats. You’ll have those ready-to-share JPEGs for immediate use, plus the RAW files that you can play around with later for enhanced images. Making this choice can really elevate your photography, giving you the best of both worlds. Now, if you’re ready, let’s explore some practical tips on how to make the most of each format! Additionally, using drones with CMOS sensor technology can significantly improve the dynamic range and color accuracy of your RAW images.
The Perks of Choosing RAW for Your Drone Shots
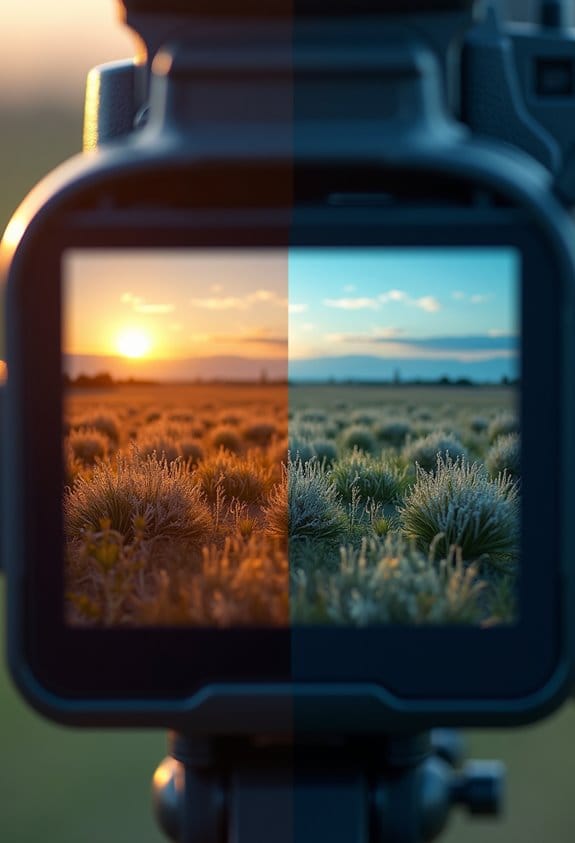
When it comes to drone photography, choosing RAW over JPEG just makes sense, and I’ll tell you why. Shooting in RAW gives you a treasure trove of data straight from your drone’s sensor, which is fantastic for editing later. For example, if you’re working with a sunset shot, that extra data means you can adjust the brightness without losing those beautiful colors in the sky or details in the shadows.
Another cool aspect of RAW files is that they let you edit non-destructively. This means you can tweak things like white balance after taking the shot without worrying about damaging the original image quality. Imagine capturing an aerial view of a park and later adjusting the colors to make the greenery pop, while still keeping all that original detail intact.
And when you’re ready to print those photos, the resolution you get from RAW files is a must, especially if you want to create something large-scale for your wall or for a gallery. Those extra details really shine through in larger prints! So, when you’re out flying your drone, think of RAW as your best buddy for capturing stunning visuals. Featuring drones with 4K Ultra HD cameras, you ensure the highest detail possible for your shots. What’s next on your photography checklist?
Why JPEG Is Ideal for Quick Sharing?
You know, while RAW photos have their perks, JPEG files are actually super handy, especially when you want to share your drone shots right away. JPEGs are smaller, which means they load faster and are easier to upload to social media—perfect for capturing those epic moments and sharing them on the fly. Imagine you just captured an incredible sunset over the ocean; with JPEGs, you could have that photo on Instagram in minutes without any fuss.
Another great thing is that JPEGs don’t require much processing time. You can literally snap a photo and share it just two seconds later! This speed is a lifesaver during action-packed scenes, like filming a bird in flight or a bustling city street. Plus, you don’t have to stress about extensive edits; most of the time, they look great as is. So, whether you’re at a family gathering or a travel adventure, JPEGs let you connect and share those precious moments instantly. Additionally, many drones offer real-time FPV transmission, allowing you to preview and share images quickly while still in flight.
Choosing Between RAW and JPEG for Your Needs
When it comes to capturing drone photos, deciding between RAW and JPEG is really about understanding your needs. If you’re looking for flexibility in editing your shots later, shooting in RAW is the way to go. It captures more detail, which means you can tweak things like exposure and color without losing quality. For example, if you snap a photo during sunset and realize it’s a bit too dark, a RAW file gives you the ability to brighten it up seamlessly.
On the flip side, if you’re in a rush and want to share your photos quickly—maybe you’re at a family gathering or a local event—JPEG is your friend. It’s easy to handle, processes faster on the drone, and you can get those images out on social media without much fuss.
So, what’s the best approach? Consider using both formats! Shoot in RAW for those stunning landscapes or special moments where you want to really perfect the image later, and opt for JPEG when you just want to capture the fun of the moment without a lengthy editing process. This way, you can enjoy the best of both worlds!
Additionally, many NDVI camera drones support both RAW and JPG formats, giving you flexibility in post-processing and quick sharing according to your project needs.
What’s your next photography adventure?
Streamlining Your Workflow With RAW and JPEG
Hey there! You know, using both RAW and JPEG formats in photography can really boost your workflow. By shooting in both, you can quickly share those JPEGs on social media while keeping the RAW files safe for any future edits. It’s like having your cake and eating it too!
Let’s break it down a bit. JPEGs are smaller, so they’re perfect for on-the-go sharing. Imagine snapping a shot at a family gathering and instantly posting it online—you want that speed! On the flip side, those RAW files are your best friends when it comes to serious editing. They hold onto all that high-quality info, which means you can play around with exposure and colors without worrying about losing detail—think of it as having a high-resolution backup for when you really want to fine-tune your photos. Using a variable power supply can ensure your drone’s battery stays charged safely and efficiently during long shoots.
Frequently Asked Questions
Should I Shoot Photos in RAW or JPEG?
We recommend shooting in RAW for maximum editing possibilities and shooting flexibility. However, we’re mindful of file size; if we need quick sharing, JPEG can work too, striking a balance between quality and convenience.
What RAW Format Does DJI Use?
DJI uses the DNG format for RAW images, offering incredible editing flexibility. While DNG files may be larger than JPEGs, they allow us to explore vast DJI color profiles, creating vivid, stunning photographs that captivate.
Is RAW or JPEG Better for Astrophotography?
For astrophotography, we find RAW benefits far outweigh JPEG limitations. RAW files let us capture more data and edit effectively, enhancing celestial details. Following our astrophotography tips guarantees we get the most out of our images.
Are RAW Images Sharper Than JPEG?
Absolutely, RAW images are staggeringly sharper than JPEGs! The sharpness comparison reveals that RAW’s editing flexibility allows for precise adjustments, while JPEG’s smaller file size compromises quality. We recommend RAW for the best results!