As an Amazon Associate, we earn from qualifying purchases. Some links on this site are affiliate links at no extra cost to you. Our recommendations are based on thorough research and editorial judgment.

How Light Conditions Determine Your ND Filter Choice
When choosing an ND filter, light conditions are key. In bright sunlight, we might opt for stronger filters, like 10 to 20-stop options, to achieve desired effects such as long exposures. Conversely, in lower light, lighter filters like 1 to 3 stops are more suitable. Evaluating ambient light levels helps us determine the right filter strength, ensuring ideal exposure. Understanding these factors can enhance our photography, so let’s explore how to make informed choices together.
Key Takeaways
- Bright sunlight requires stronger ND filters (5-stop to 15-stop) to prevent overexposure and enable longer shutter speeds.
- In lower light conditions, lighter ND filters (1-stop to 3-stop) can be used to achieve motion blur without overexposing the image.
- Assessing ambient light levels throughout the day is crucial for selecting the appropriate ND filter strength.
- Cloud cover can enhance ND filter effectiveness by diffusing sunlight and improving exposure outcomes.
- Transitioning light conditions necessitate replacing heavier ND filters with lighter options to maintain optimal image quality.
How ND Filters Control Exposure in Bright Light
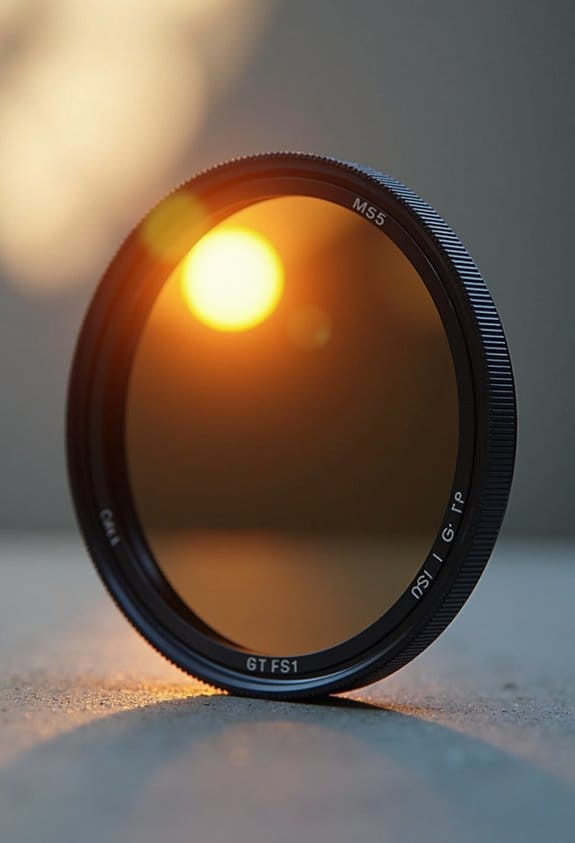
When you’re out shooting in bright light, managing exposure can be quite the challenge, right? That’s where neutral density (ND) filters come into play. They’re like sunglasses for your camera, allowing you to control how much light gets in. This can really help us achieve those dreamy effects we love, like soft water or motion blur in our shots.
So, how do they actually work? Well, ND filters reduce the amount of light hitting your sensor, which means you can use longer shutter speeds without overexposing your image. For example, if it’s a sunny day and you want to create a gentle blur on a waterfall, a 1-stop ND filter can cut the light by half, making it easier to get that perfectly balanced exposure. On the flip side, if you’re shooting in super bright conditions, like high noon on a beach, you might want to reach for a 15-stop or even a 20-stop ND filter. This way, you can still shoot long exposures without blowing out the highlights—perfect for capturing those vibrant, dynamic shots.
Choosing the right ND filter strength is crucial for nailing your desired look. It can seem a bit tedious, but once you get the hang of it, you’ll find it opens up a world of creative opportunities, especially in bright lighting situations. Now, let’s talk about how to incorporate these filters into your workflow for optimal results. Additionally, using high-quality optical glass in your ND filters ensures better color accuracy and minimal distortion, enhancing your final images.
Recommended Products

【58mm Lens Filter Accessories】This NEEWER lens filter accessory kit has 9 pieces to choose from: UV/CPL/FLD filter, ND2/ND4/ND8 filter, tulip visor, foldable rubber sun visor, snap-on lens cap, carrying pouch, safety clip and lens cleaning wipe. Compatible with all 58mm lens threads (marked with the symbol "Φ58" under the lens barrel), regardless of camera models

Filter Wrench is specially designed for removing jammed or over-tightened filters from your lens. The filter wrench is ideal for detaching all kinds of filters, including UV, CPL, ND, etc

【Lightweight Design】 The filter frame is made of aviation aluminum alloy, and the edge of the frame adopts CNC non-slip design, which is easy to install and disassemble. It weighs only 1.2g without affecting drone calibration and balance.
Selecting ND Filter Strengths for Various Lighting

Choosing the right ND filter strength is super important for making the most of different lighting situations in photography. When you’re out in bright daylight, you’ll want to reach for a 5-stop to 10-stop neutral density filter—think ND32 to ND1000. This can really help you capture those dreamy long exposure shots, like silky water flowing over rocks or clouds streaking across the sky.
If you’re facing those really harsh lighting conditions and want to go all out, grabbing a 15-stop to 20-stop ND filter (that’s ND32000 to ND1000000) can work wonders. It allows for ultra-long exposures, perfect for softening harsh sunlight on water surfaces or creating motion in your landscape shots. On the flip side, when the light is low, just a 1-stop ND filter (ND2) can do the trick. This is great for adding a little motion blur without losing your overall exposure.
The key here is to think about the ambient light, what shutter speed you want, and what kind of creative effect you’re aiming for. By understanding these elements, you’ll be better equipped to choose the ND filter that helps you achieve the stunning images you have in mind. Speaking of creativity, let’s explore how different shutter speeds can enhance your photography even further.
Additionally, considering the optical quality of your ND filter ensures clarity and true color reproduction in your images.
Recommended Products

【6 Pack Snap On Drone Lens Accessories】 The kit for your drone gear includes 4 x Neutral Density filter (ND4/ND8/ND16/ND32), 1 x circular polarizing filter, and 1 x UV filter, compatible with DJI Mini 4K Drone with 4K UHD Camera for Adults/ Mini 2 / Mavic Mini / Mini SE / Mini 2SE and Fly More Combos, meeting various photography needs, from glare reduction to long exposure effects, as well as providing lens protection. Simple snap on design makes easy and swift filter attachment and dismounting

When you buy a new lens with a different diameter, you don't want to buy another set of filters for it.

【Osmo Pocket 4/3 Filter Kit】This magnetic filter from K&F CONCEPT is specially designed for DJI Osmo Pocket 4/3, which includes CPL, ND2-32, Black Diffusion 1/4 filter, made by top imported AGC optical glass, adopted multilayer coating on both side, features hydrophobic, repel dust, grease, and anti-scratch, easy to clean and maintain, it's a valuable addition to your photography toolkit, basically covers your daily shooting needs. NOTE: This product works perfectly for both Pocket 3 and Pocket 4. We are currently updating our packaging. You may receive a package labeled “for Pocket 3” – the product inside is exactly the same and fully compatible with Pocket 4.
Assessing Ambient Light Levels for Optimal ND Filter Use

Hey there! So, you’re thinking about how to evaluate ambient light levels before choosing an ND filter, right? It’s actually pretty important because picking the right strength can make a world of difference in your photos. When you’re out in bright environments, like a beach on a sunny day, a 5 to 10-stop ND filter can really help manage your exposure so things don’t get washed out.
A practical tip is to use the Sunny 16 rule as a starting point. Picture this: If you set your camera to ISO 100, aperture at f/16, and a shutter speed of 1/125 second, you’ll have a solid baseline to work from. Once you have this setup, remember to think about how that moving water in your shot, like waves or a river, can really influence the look of your images. Sometimes a slower shutter speed can create that dreamy, smooth effect on the water that’s so captivating.
Also, keep in mind that ambient light isn’t constant—it changes throughout the day. So, taking a moment to re-evaluate your settings every now and then will help you capture the best possible image quality. This way, you’re always ready to adjust and take amazing photos no matter the lighting conditions you’re faced with! Using multi-coated surfaces on ND filters can further enhance image quality by reducing reflections and maintaining sharpness.
Effective Techniques for Long Exposures in Challenging Lighting
Capturing stunning long exposures in tricky lighting can seem a bit daunting, but trust me, with the right techniques, you can transform these challenges into creative gold! For instance, on a bright sunny day, using a strong neutral density (ND) filter—like a 10-stop or 15-stop filter—can really help. These filters reduce the light hitting your camera’s sensor, allowing you to use longer shutter speeds. This is fantastic for smoothing out water surfaces or capturing the flow of clouds moving across the sky.
When you’re out photographing during sunset or sunrise, a graduated ND filter can save the day. It helps even out the exposure between the bright sky and the darker foreground, so you get a well-balanced image. Just keep an eye on the movement of the water in your scene; if the water is moving slowly, you might not need as strong of an ND filter. Sometimes, stacking a couple of filters can give you more versatility, but be careful not to overdo it—you want to maintain image quality, after all.
Also, don’t shy away from experimenting with different shutter speeds. Try starting with a slower shutter speed and adjust to see how the movement changes in your shot. It’s all about finding what works best for the scene in front of you. With these tips in your back pocket, you’ll feel more confident next time you’re out shooting. Now, let’s talk about how to perfect your composition for those long exposure shots! Remember, using a high-quality Neutral Density filters with multi-layer coatings can significantly enhance image clarity during long exposures.
Recommended Products

This filter 10 stop fixed neutral density filter exposure correction, not variable.
This filter 10 stop fixed neutral density filter exposure correction, 【not variable】.

How to Compare Fixed, Graduated, and Variable ND Filters
When it comes to ND filters, it’s really fascinating how each type has its own unique strengths and weaknesses, making them more suited for different shooting scenarios. For example, fixed ND filters are great if you’re looking for consistent exposure adjustments; they cut light by specific stops, which is especially handy for long exposures on sunny days. Imagine trying to capture that silky smooth waterfall effect in bright daylight—this is where a fixed ND filter shines!
On the other hand, graduated ND filters have this cool gradient from dark to clear, which helps balance out the exposure in scenes where you have a bright sky and a darker foreground. Think of landscape shots at sunset. You can keep those stunning clouds properly exposed while not losing detail in the darker areas below.
Then we have variable ND filters, which offer some flexibility. You can adjust how much light gets through with just a simple twist, usually allowing for 2 to 9 stops of light reduction. Just be cautious about unwanted vignetting around the edges, especially at the higher stops!
Choosing the right ND filter depends a lot on your shooting conditions and whether you need to keep color neutrality in your images. It’s all about what you want to achieve in your photography! Now, let’s explore how to actually use these filters effectively in your shots.
Additionally, considering the impact of weather conditions such as bright sunlight or cloud cover can help optimize the effectiveness of your chosen ND filter.
Recommended Products

【Dedicated to Mini 4 Pro Drone Lens】 Precisely CNC machined to be exclusively compatible with the DJI Mini 4 Pro. This ND & CPL filter kit is a game changer for all drone enthusiasts seeking to fine tune shutter speeds, reduce flare, enhance color, and achieve perfect exposure in different weather conditions. Made of aircraft level aluminum alloy, the lightweight 0.11oz/3.2g filters won't interfere with drone calibration and balance

【1-5 Stop Light Reduction】The variable nd2-32 filter provides 1-5stop light reduction. You can use it on the Partly Cloudy day to bright sunny day.No color shift.

【Import Optical Glass】Crafted from premium AGC optical glass with 8 multi-layer coatings, this ND filter reduces reflections and glare, ensuring superior image quality.
Transitioning From Daylight to Low Light: Adjusting Your ND Filter?
Hey there! So, when we’re moving from bright daylight into those lovely low light conditions, adjusting your ND filter strength is super important to keep your images looking their best. You might want to swap out a heavier ND filter—like a 5-stop or even a 10-stop—for something lighter, maybe a 1-stop or 3-stop filter. This switch helps you adapt smoothly to changing light levels while still capturing all those beautiful details.
For instance, if you’re filming a serene sunset over a calm lake, using a lighter ND filter can help you maintain that dreamy effect without overexposing the colors. And remember, if the water is really calm, you might not need as much filtration at all. You can also play around with your shutter speed or open up your aperture a bit more. Doing this lets you catch those soft, subtle changes in light as day fades into night, making your shots even more enchanting.
To ensure the best results, consider using filters made from premium Schott B270 glass, known for their exceptional optical clarity and durability.
Now that you’ve got the hang of adjusting your ND filters, let’s talk about other ways to enhance your nighttime photography!
Recommended Products

Adapt to strong lighting conditions with ND16/64/256 filters and always be ready for the perfect shot.

【Compatible with Xtra Muse & Pocket 3 / 4】 Compatible with Xtra Muse and DJI Osmo Pocket 3 / Pocket 4 as content creator essential and influencer must have accessories.

Precisely engineered for the DJI Mavic 3 Pro.
Frequently Asked Questions
How to Decide Which ND Filter to Use?
When we’re picking an ND filter, we shouldn’t just throw darts at a board! Let’s consider metering techniques, exposure settings, shooting styles, and landscape photography. Variable filters can save us from long exposure disasters!
What Is the 500 or 300 Rule in Photography?
The 500 and 300 rules help us determine maximum shutter speed for long exposure astrophotography. By balancing exposure triangle elements—shutter speed, lens aperture, and ISO settings—we reduce star trails and minimize motion blur in our images.
Which ND Filter Is Best for a Sunny Day?
For sunny days, we typically opt for a 5 to 10-stop ND filter, balancing light intensity and exposure settings. This allows for creative techniques in landscape photography, enhancing color grading while mastering filter application for stunning results.
Is ND1000 Enough for a Solar Eclipse?
No, an ND1000 isn’t enough for solar eclipse safety. We should use stronger ND filter types, like ND32000, and consider exposure time calculations to guarantee maximum image quality and equipment protection under those extreme viewing conditions.


